Sidebar
Table of Contents
MyFiles - User Guide
MyFiles is a web service for secure data exchange between GEPARD and its partners.
It is easy to use, and you will only need an up-to-date web browser.
For your safety
- Please Log-out after finishing your up- und downloads
- Sensitive data should stay in this web area only for a very short time
1. Login
Open the web adress:
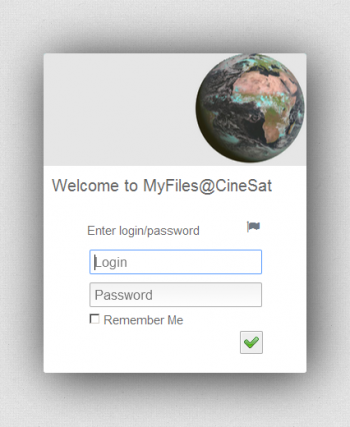
This link opens a login window (start-up may take a few seconds):

Please note that user name and password are both case sensitive.
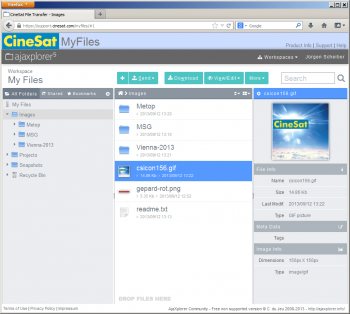
After successful login you will get an application window with upload, download, and standard file browser functionality.
2. Your MyFiles Window
Your MyFiles application window consists of
- Three color-coded tool bars, the
- Browsing area (file list and navigation panels), and a
- Bottom info line with links to legal documents
Window Layout
| Banner | ||
|---|---|---|
| MenuBar | ||
| ActionBar (Send, Download, View, …) | ||
| Folder Tree | File List | File Details |
| … | ||
| … | ||
| Bottom Info Links | ||
Three color-coded tool bars
| Toolbar Name | Bar Color | Description |
|---|---|---|
| Banner | steel blue | Links to CineSat sites and MyFiles Help |
| MenuBar | dark gray | Workspace selection and Account / Logout menu |
| ActionBar | white | Workspace name and action buttons/menus (Send, Download, View, Edit, …) |
Browsing Area
| Panel Name | Where | Description |
|---|---|---|
| Folder Tree | Left (gray) | Directory tree to navigate through the current workspace |
| File List | Center (white) | File name display and selection list; also the drag-and-drop target area for quick uploads |
| File Details | Right (gray) | Details of selected files |
Bottom Info Links
- Legal info documents (Terms of Use, Privacy Policy, Impressum)
- Link to AjaxPlorer website
3. Choose Your Workspace
Most partners have only one up- and download area named “My Files”. For general data exchange please always use this “My Files” workspace.
As a project partner you may have access to more than one workspace area for software and data exchange.
You find the name of your current workspace in the ActionBar. The start-up workspace is your personal folder “My Files”. If necessary choose another workspace from the “Workspaces” drop-down list in the MenuBar.
4. Download files to your computer
Downloading files is easy, intuitive, and standard:
- select the file(s) for download
- click on Download
- select your local storage location
Download Steps
- Select your download area:
- MyFiles starts in your personal directory “My Files”
- Other download areas can be selected in the “Workspaces” drop-down list (MenuBar)
- Change to the desired sub-directory in left-side folder tree
- Select requested files in center panel
- Note: Multiple selected files will automatically be packed into a single ZIP file for download
- Click action button “Download” (ActionBar)
- As with any other Internet file download, your browser will either store the data in a fixed download directory or open a window to select your local storage place.
- In pop-up window: Select destination folder on your computer > “Ok”
- Logout: Menu “Your User Name” > “Log out” (MenuBar)
5. Upload files from your computer
There are two easy ways for uploading file depending on your browser's capabilities:
- Use the Send button or
- Drag-and-drop your file(s) from your local file browser (e.g. Windows Explorer) to the MyFiles destination folder
Note: The 2nd option is not supported by all browsers.
- Drag-and-drop is not supported in IE8
- Tested with IE10 and recent Firefox (Windows)
Upload steps
- Select your upload area:
- MyFiles starts in your personal directory “My Files”
- Most external users will upload files into their “My Files” Workspace
- Other upload areas can be selected it in the “Workspaces” drop-down list (MenuBar)
- Open target sub-directory in left-side Folder Tree
- If your browser supports drag-and-drop:
- simply drag-and-drop the file from your local file browser into the white background of the MyFiles File List
- If drag-and-drop does not work:
- Click action button “Send” > “From computer” (ActionBar)
- Press “Select files on your computer” button in the Send pop-up window
- Select the local files to be uploaded
- The selected files will be uploaded
- Depending on your browser it may be necessary to refresh the MyFiles file list to properly see all uploaded files:
- Right-click on the white File List panel and
- Select Refresh
- Logout: Menu “Your User Name” > “Log out” (MenuBar)
6. Deleting Files
Delete
- You can delete files only if you have the necessary access permissions.
- To delete one or more files or directories:
- Select them in the File List
- Right-click > Delete
Note: Deleted files are moved to the wastebasket (Recycle Bin).
Restore deleted files
To recover a file from Recycle Bin:
- Go to directory Recycle Bin by selecting it in the left-side Folder Tree
- Right-click on the file to be restored (File List)
- From the context popup menu select Restore
Empty wastebasket
To empty Recycle Bin:
- Go to directory Recycle Bin by selecting it in the left-side Folder Tree
- Right-click on the white panel background of the File List
- From the context popup menu select Empty
7. Further Functions
The web-based “MyFiles” service offers all functions of a standard desktop file browser (like Windows Explorer) including
- Create, delete, and rename files and directories
- Copy and move files
- View images and some other file formats
- Directly view and edit text files
These functions can be accessed from the ActionBar or from the context menu that pops up with a right-click in the File List, i.e.
- for file operations right-click on a file or file selection
- for directory operations right-click on the white background
8. Changing Password
We strongly recommend to change your password with first login.
- Move mouse pointer over your user name (top right)
- In drop-down menu > Select
Change Password - In Change Password dialog window:
- Enter old password
- Enter new password (2 times)
- Click on

9. Logout
For your safety
- Please Log-out after finishing your up- und downloads
- Sensitive data should stay in this web area only for a very short time
You need to log out after finishing the file transfers. Simply closing the browser does not log you out and may leave a security hole open that allows other users or hackers to use your login and to access your data.
To log out click on “Your User Name” > “Log out” on the right side of the MenuBar.


